1、功能代码:
function article_index($content) {
$matches = array();
$ul_li = '';
$r = "/<h3>([^<]+)<\/h3>/im";
if(preg_match_all($r, $content, $matches)) {
foreach($matches[1] as $num => $title) {
$content = str_replace($matches[0][$num], '<h3 class="title-'.$num.'">'.$title.'</h3>', $content);
$ul_li .= '<li><a href="#title-'.$num.'" title="'.$title.'">'.$title."</a></li>\n";
}
$content = "\n<div id=\"article-index\" class=\"article-index hidden-xs\">
<strong class=\"title\">文章目录</strong>
<ul id=\"index-ul\" class=\"index-ul\">\n" . $ul_li . "</ul>
</div>\n" . $content;
}
return $content;
}
add_filter( "the_content", "article_index" );
上述代码添加到主题functions.php文件中最后一个>;之前即可
然后需要在主题style.css文件中添加如下的css样式
#article-index {
    -moz-border-radius: 6px 6px 6px 6px;
    border: 1px solid #DEDFE1;
    float: right;
    margin: 0 0 15px 15px;
    padding: 0 6px;
    width: 200px;
    line-height: 23px;
}
#article-index strong {
    border-bottom: 1px dashed #DDDDDD;
    display: block;
    line-height: 30px;
    padding: 0 4px;
}
#index-ul {
    margin: 0;
    padding-bottom: 10px;
}
#index-ul li {
    background: none repeat scroll 0 0 transparent;
    list-style-type: disc;
    padding: 0;
    margin-left: 20px;
}
2、使用说明:
在编辑文章的时候,将索引部分设置为3级标题,
3、代码自定义:
你也可以设置为2级标题,此时需要将功能代码中的所有的h3改为h2。
2016年4月12日更新:
如果需要同时匹配h2和h3标签,推荐使用下面这种,同样还是加入下面代码到主题functions.php文件中去
/*
*   author:轩枫
*   整理:陌小雨
*/
function article_index($content) {
    $matches = array();
    $ul_li = '';
    //匹配出h2、h3标题
    $rh = "/<h[23]>(.*)<\/h[23]>/im";
    $h2_num = 0;
    $h3_num = 0;
    //判断是否是文章页
    if(is_single()){
         if(preg_match_all($rh, $content, $matches)) {
            // 找到匹配的结果
            foreach($matches[1] as $num => $title) {
                $hx = substr($matches[0][$num], 0, 3);      //前缀,判断是h2还是h3
                $start = stripos($content, $matches[0][$num]);  //匹配每个标题字符串的起始位置
                $end = strlen($matches[0][$num]);       //匹配每个标题字符串的结束位置
                if($hx == "<h2"){
                    $h2_num += 1; //记录h2的序列,此效果请查看百度百科中的序号,如1.1、1.2中的第一位数
                    $h3_num = 0;
                    // 文章标题添加id,便于目录导航的点击定位
                    $content = substr_replace($content, '<h2 id="h2-'.$num.'">'.$title.'</h2>',$start,$end);
                    $title = preg_replace('/<.+>/', "", $title); //将h2里面的a链接或者其他标签去除,留下文字
                    $ul_li .= '<li class="h2_nav"><a href="#h2-'.$num.'" class="tooltip" title="'.$title.'">'.$title."</a></li>\n";
                }else if($hx == "<h3"){
                    $h3_num += 1; //记录h3的序列,此熬过请查看百度百科中的序号,如1.1、1.2中的第二位数
                    $content = substr_replace($content, '<h3 id="h3-'.$num.'">'.$title.'</h3>',$start,$end);
                    $title = preg_replace('/<.+>/', "", $title); //将h3里面的a链接或者其他标签去除,留下文字
                    $ul_li .= '<li class="h3_nav"><a href="#h3-'.$num.'" class="tooltip" title="'.$title.'">'.$title."</a></li>\n";
                }
            }
        }
        // 将目录拼接到文章
        $content =  $content . "<div class=\"post_nav\"><ul class=\"post_nav_content\">\n" . $ul_li . "</ul></div>\n";
        return $content;
    }elseif(is_home){
        return $content;
    }
}
add_filter( "the_content", "article_index" );
如果需要指定文章加入文章索引/文章目录,可以将上面的判断语句按需修改。
同样的需要加入css文件:
/*目录效果*/
.post_nav {
    position: fixed;
    right: 50%;
    top: 50%;
    margin-top: -24px;
    z-index: 20;
    background: #FFF;
    width: 184px;
    display: block;
    overflow: hidden;
    margin-right: 624px;
}
.post_nav .post_nav_side {
    top: 0;
    width: 0;
    min-height: 40px;
    background-color: #eaeaea;
    border: 1px solid #eaeaea;
    border-top: 0;
    border-bottom: 0;
    position: absolute;
    left: 5px;
}
.post_nav .post_nav_content {
    height: auto;
    padding-left: 18px;
    overflow: hidden;
    margin: 20px 0;
    position: relative;
    max-height: 520px;
    text-indent: 0;
    overflow-y: scroll;
    list-style:none;
}
.post_nav .post_nav_content li{
    line-height:22px;
    height:22px;
}
.post_nav_content li a.tooltip {
opacity: 100 !important;
}
.post_nav .post_nav_content li a {
    display: inline-block;
    vertical-align: top;
    max-width: 146px;
    height: 22px;
    overflow: hidden;
    -webkit-text-overflow: ellipsis;
    color: #333;
    text-decoration: none;
}
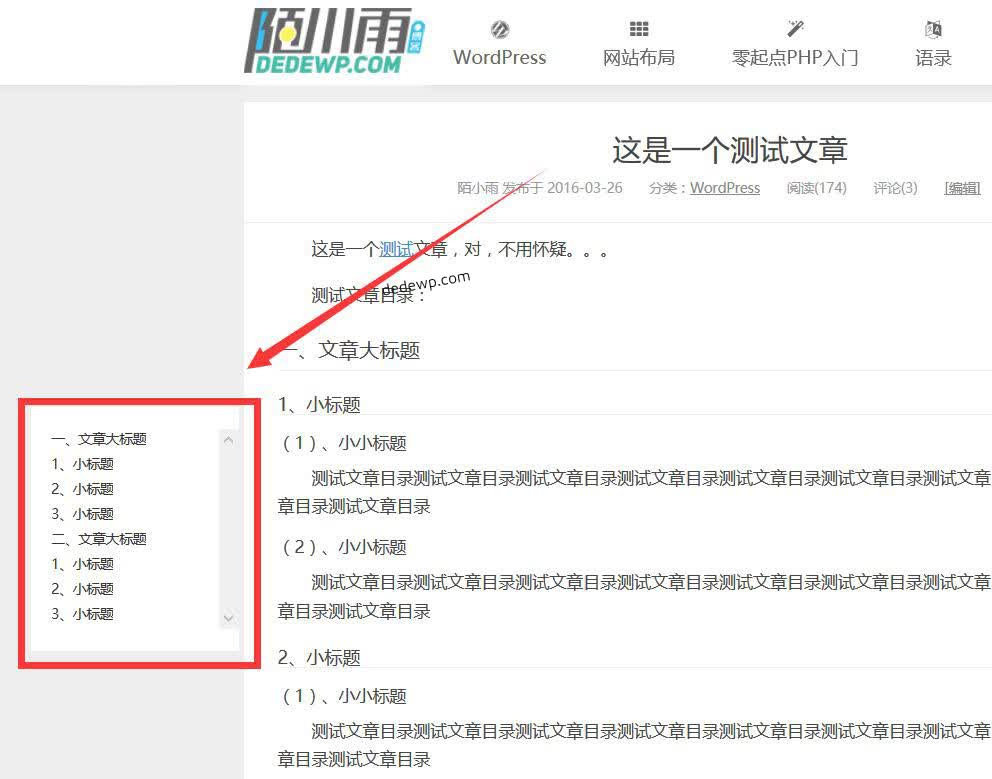
文章添加完索引后的效果图:
还是很不错的,赶快试试吧!


